iCloud is certainly not a new feature on Apple products, however many people new to iPhone, iPod or Mac still don’t know how to use this convenient feature. In this article, let’s find out what iCloud really is, how you can register an account and how to use it on your devices.
For those of you who have heard the term “the cloud” but have no idea what it means; it’s basically storing your data online so you can access it anywhere with an Internet connection. iCloud works in the exact same way – it’ll allow you to back up your music, photos, videos, applications, documents, iBooks, contacts, emails, calendars, bookmarks, notes, to do lists, texts, settings and more… all to your iTunes account. If you’re still confused then here are some examples of how this will work:
Let’s they you’re out and you snap a picture with your iPhone. It’s gonna upload that picture to the photo stream – which is a part of iCloud and synch it to all other devices – your Mac, your iPod, iPad – you’ve got everything in one place and you didn’t have to do anything, it’s all automatic. The same thing goes with music – let’s say you purchase a song on iTunes with your iPad, it’s going to start downloading on your iPhone, Mac,… all your other devices! And it’s also gonna do that with all your data automatically, which makes life so much easier!
iCloud Login – How to Sign Up and Use it on iOS Device
So how do you activate iCloud login and actually use the service? Here are some simple steps that you can follow:
Step 1 – The first thing you want to do is get on your iPhone, iPod Touch or iPad and go on to settings, make sure you have a WiFi network, and then scroll down to iCloud.
Step 2 – The first option you have on the next page is Account, click on it and make sure all the information is correct because you’re going to use it on all of your devices.
Step 3 – Next, click on Storage Plan. Here you’ll find some storage plans for iCloud, with 5 GB given to you for free. If you need more there are some paid options that Apple allows you to have.
Step 4 – When you’re done with everything just click “Save” to finish!
Step 5 – Now go back to your iClound menu in the Settings section, where you can choose what to synch within all of your devices. Mails, contacts, calendars, reminders, bookmarks,… just about everything!
Step 6 – The next option is “Storage and Backup”. This is going to tell you how much storage you have left and you can also enable iCloud back up which I highly recommend you do because you won’t have to back it up on your iTunes computer.
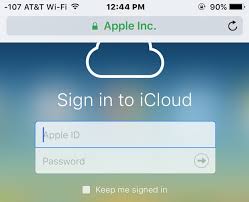
iCloud Login – iCloud Sign In from Mac
First, simply go to icloud.com and then log in with your iClound account information – it should be your Apple email address on the settings section in the previous part.
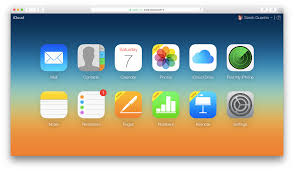
Once you logged in, you can have access to some of the features of iCloud, like Mails, Contacs, Calendars, Notes,… and especially the “Find My iPhone” feature which you can use to locate your phone and even remotely control it, in case you’ve lost your phone.
And that’s just about everything you need to do to get started with iCloud Login on your devices. This is truly a convenient feature of Apple that lets you access all of your information anywhere, across all your devices as long as you have an Internet connection, so be sure to have it enabled!
Incoming search terms:
- İcloud oturum aç
